Category Archives: Installations

REG_MULTI_SZ and Windows Installer

2
Filed under Installations

image I have an InstallShield 11.5 based installation, and, at some point, it went south, but in a very subtle way that I did not immediately notice.

For those with a short attention span, I’ll summarize the issue like so:

DO NOT use the “System Search” ability in InstallShield (or the REGLOCATOR table in MSI, for that matter) to retrieve a registry value of the “REG_MULTI_SZ” format.

Doing so appears to cause Windows Installer to internally skip large portions of  Maintenance mode operations, such as Repair, or Remove.

Essentially, the problem was this…

If you open the ARP (Add Remove Programs list) and select a “normal” install, you should see two buttons, Change and Remove.

Clicking Remove will work perfectly fine, regardless of anything I mention here.

Clicking Change, on the other hand, brings up the “Maintenance Mode” screen of an InstallShield installation.

From there, you have 3 radio button choices:

  • Modify
  • Repair
  • Remove

So far so good.

However, in my installation, none of those options actually DID anything anymore. The progress bar would update and go to 100%. You see things apparently happening, but when it all finished, nothing actually had happened.

Now, they ALL worked at one point, but exactly when things broke, there was no real way to tell. This install is >100MB, so I don’t make it a habit of checking in all the various interim builds of the install.

All I did know was that the last released version (which I did have laying around<g>) worked just fine, but the latest version did not.

What’s worse, the last released version was dated some 8 months back, and there had been literally hundreds of changes to the install in the interim, including removed and added files, new scripting, new components, etc.

After working with Macrovision for almost a month and a half, I’d still made absolutely no headway on the problem.

The prospect of reverting back to an 8 month old version and redoing every individual change, along with testing the install to make sure that the maintenance mode would work after each change, was, to the say the least, utterly horrifying.

Macrovision had no thoughts as to even how to debug the issue, much less what might be causing it.

Very early on, I’d already hit on the obvious things.

  1. Generating a full verbose log of both the old, successful install and subsequent uninstall and comparing that to the same log from the new version yielded no clues.
  2. Saving the ISM files (the InstallShield source of an installation project) as XML files and the comparing the old and new also yielded nothing that stood out as a problem.

Long story short, after several days of applying the various changes to the early, working version, I got extremely lucky and stumbled on the cause of the problem.

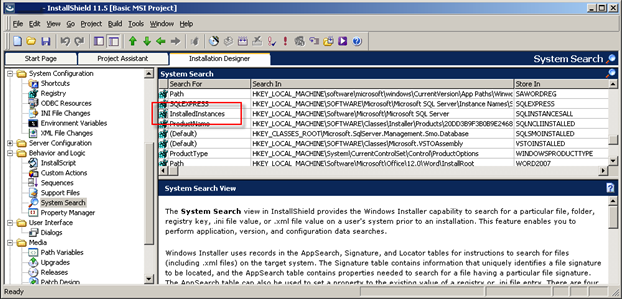
I’d added several “System Search” items to detect already installed prerequisites and the retrieve specific system information I needed during the installation.

One of these was to retrieve the “InstalledInstances” value from the registry key

HKLM\Software\Microsoft\Microsoft SQL Server

image

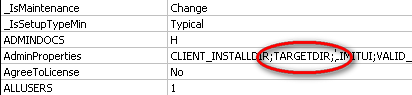
This functionality isn’t really InstallShield based, it’s a part of MSI from what I can tell. The definition of the system search element is actually stored in the REGLOCATOR table in the MSI file:

image

So, at least for now, I can’t blame this one on InstallShield.

As it happens, that registry key is a REG_MULTI-SZ value, meaning it can have a single string value, or multiple values, separated by null chars.

And it just so happens that on my test machine, I had two different instances of SQL Server installed, so there just happened to actually be a REG_MULTI_SZ value in that key.

And THAT was the cause of all this headache.

What’s truly ironic about all this is that the installation wasn’t actually using the property that resulted from this System Search anymore. At one time, it checked the listed installed instances of SQL Server for their applicability to our install, but I’m not actually doing that anymore.

Moral of the story? Don’t use the SystemSearch capabilities of an MSI install to retrieve a REG_MULTI-SZ registry value. It’ll work, but then the maintenance mode of your install could very likely fail inexplicably, not to mention what other consequences I haven’t stumbled upon.

Lastly, I did some googling once I’d narrowed things down and found, well, nothing, on the web or MacroVision’s site about it. Maybe what I’m seeing is something specific to my particular machine, maybe not. Given InstallShield’s resistance to being installed twice on different machines with the same license, I’m not willing to jump through those hoops just to test that suspicion.

But maybe this will help someone else caught in those same throes.

Nested SQL Express Installation – Part Deux

3
Filed under Installations, SQL

I wrote about various troubles nesting SQL Express installations a few days ago here.

I just wanted to add a little more info for those interested.

Come to find out, it’s still possible for SQL Express to end up requiring a reboot, which, if you’re install was planning on performing DB tasks, puts a cold, wet, nasty damper on your fireworks quick.

But, from what I can tell so far, it’s almost always going to be related to a file or files that the SQLExpress install needs to replace but can’t because they’re locked.

I’d had some difficulty finding any info on how you might determine exactly what file(s) it was that were locked when I came across this post on MS Technet.

Basically, immediately after you install, but BEFORE you actually reboot, fire up REGEDIT and check out:

HKLM\system\currentcontrolset\control\sessionmanager\pendingfilerenameoperations

The value should contain the names of any files that couldn’t be replaced during the install and are queued for replacement.

At that point, it’s just a matter of determining which process(es) have those files open, and making sure your install verifies that those processes are closed before allowing the installation to continue.

In my case, so far it’s always been an issue with MSDE 2000 already installed a running on the machine. The SQLDMO.DLL is used and locked by the running MSDE process, but the SQLExpress install needs to replace it.

It’s a royal pain to be sure, but at least there is something that can be done about it.

Nesting the SQLExpress 2005 Install

8
Filed under Installations, SQL

I recently had the pleasure of trying to get SQLExpress 2005 to install, on request, during my application’s install, according to various parameters specified by the user during the UI portion of my install. Phew. Yeah, it’s hard enough to say, much less code.

Anyway, the basic problem is that you can’t nest MSI installs. And since an “MSI Install” is considered to be the portion of the install that runs during the EXECUTE sequence of the MSI logic, this means you can’t just execute SQLEXPR32.EXE at some point during the EXECUTE sequence of your install.

This is normally what you’d want to do because then, that action would happen regardless of whether your installation was running silently (ie no UI) or not.

Ok, that’s off the table. Hey, Microsoft! Believe it or not, nesting installs is something real world apps have to do in order to get all those nifty libraries of yours out there onto client machines! Sigh.

Fortunately, in my case (and in many others I’m guessing), not being able to run the SQL Express installer during a silent install is not a deal breaker. More than likely, if my installation is being rolled out silently, whoever’s rolling it out is using some sort of automated rollout tool to do it, and it’s likely they’ll just automate the rollout of SQLExpress as well.

But, what about when a user is simply trying to run my installation to get the product on their machine. In this situation, you want a no fuss, no muss process that has a user up and running with a little decision-making as possible. The last thing I want a user being prompted for is the instance name to use for the SQL Server that’s about to get installed. Sheesh.

Well, I can’t nest MSIs, technically, but I can execute SQLEXPR32.EXE from the UI sequence of the install.

Aha! Success! Except that, as well documented by any number of posts online, it doesn’t work consistently. Often, you’ll get an MSI error 110 indicating that SQL can’t access a file (usually sqlncli.msi) that it needs to complete the install.

            ******* CommandLine: **********
MSI (s) (18:00) [12:59:55:555]: Machine policy value 'DisableUserInstalls' is 0
MSI (s) (18:00) [12:59:55:575]: Note: 1: 1309 2: 5 3: C:\23661fc1e2705da3b45f5b05\setup\sqlncli.msi 
MSI (s) (18:00) [12:59:55:595]: MainEngineThread is returning 110
The system cannot open the device or file specified.

Trouble is, the file is there, exactly where the log says it isn’t.

The problem is clearly an issue with the SQLExpress installer. I can say that pretty confidently because you can nest all of SQL’s prerequisite installs just fine, including:

  • MSXML6.MSI (The XML 6.0 libraries)
  • SQLCNLI.MSI (SQL Native Client)
  • SQLServer2005_XMO.msi (SQL Server management objects installer)
  • And even VSTOR.EXE (the Visual Studio Tools for Office)

Just not the SQLEXPR32.EXE itself.

One possible solution that I found mentioned online was to extract all the SQLEXPR32.EXE files, then actually include them directly in your installation and at the end of your installation (in the UI sequence) launch the SETUP.EXE that starts the SQLExpress installation.

So I extracted them all:

SQLEXPR32.EXE /x:c:\SQLEXPR

Ouch. And I mean owwwwwwwwwchaaaaaa. 400+ files scattered over dozens of directories. The InstallShield Component Wizard choked trying to add them all as components and there was simply no way I was going to manually set up all that felgercarb in my install. Yeah, I went there<g>

Then it struck me. The extraction process (that /x command line arg) isn’t actually an msi install, so I should be able to nest it just fine. And if that’s the case, then I could extract all the files from SQLEXPR.EXE dynamically after installing the exe, and then fire up SQL’s setup.exe directly, just as I’d tried launching the SQLEXPR32.exe before (but that failed with the 110 error).

So, first, make sure you install the SQLEXPR32.EXE along with the rest of your application’s files.

Then, set up a Custom Action in your MSI project, in the EXECUTE sequence, that extracts all the files from SQLEXPR32.EXE to some folder (usually inside your INSTALLDIR somewhere):

image

(note the use of /q; that will keep the extraction process quiet, including suppressing a rather bothersome “Extraction process done” message box when it finishes, Also note that this adds substantially to your app footprint so you may need to accommodate that in available space calculations).

Next, create another Custom Action to execute the SQL Express SETUP.EXE that was extracted in the previous step.

image

Set this CA to execute towards the end of the UI sequence (because this is an MSI setup and this action can’t be started from the EXECUTE sequence of your installation, no getting around that one).

I set a command line of /qb to use the basic install ui for SQL Express, but you might also want to include other command line parameters, like:

  • ADDLOCAL
  • INSTANCENAME
  • SECURITYMODE
  • SAPWD
  • DISABLENETWORKPROTOCOLS

or any of the other options you can specify. More info about the command line options for SQLEXPR32 are pretty easy to find online.

And finally, to keep your installation from looking like it just hung during the extraction part above, be sure to author a row in the ACTIONTEXT table for that custom action, and give it some text, like “Extracting SQL Server files…”. The text will show up over the progress bar that normally displays during an InstallShield-authored installation.

Let me know if this works for you, or if I’ve missed some esoteric combination in InstallShield that prevents it from working.

As always, YMMV.

When an InstallShield package code is not a package code

0
Filed under Installations

Normally, when you want InstallShield to be able to perform a MAJOR UPGRADE on an install package, you have to change both the “package code” and the “product code”, and of course, the product version. However, you’ll normally leave the “Upgrade code” the same.

If you do this, InstallShield will install your new “version” as a new product, but it will also detect the existence of the previous version due to the Upgrade code, and force an uninstall of the previous version. I’ve actually blogged about this before here.

That’s exactly what I was expecting when I started testing the latest version of our package (and the first that was intended to support upgrades), and I was a bit surprised and perplexed when it popped up into maintenance mode  of the previous version!

Somehow, I could start the install by dbl clicking on the MSI of the new version, but the maintenance mode of the previous, installed, version would get started?! What the hell?

I started digging through verbose logs, called Macrovision, the works, and nothing seemed to fix it.

Then, I happened to notice mention of a package code in the logs that I didn’t recognize. I checked my new version’s properties and the package code didn’t match what was in the log.

image

Where the heck was it getting this other package code from?

So, I did a search through the project and it turned up here, under the releases screen!

image

Turns out, at some point in the past, this package code had been set, which overrides the package code defined in the Summary Info Stream screen above, when I build this particular release.

Since package codes should normally change with each build, everything was getting screwed up.

I set the “Generate Package Code” option to Yes, and cleared the package code from the releases screen, recompiled and all was well.

I suppose this is an easy mistake to make, but it’s one that left me scratching my head for more than just a few minutes.

Creating MSI installs for Vista

2
Filed under Installations, Vista

Neeru Hundal has a pretty interesting and informative blog at http://msiblogger.com that’s all about MSI issues.

A very good article there focuses on issues to look out for when creating MSI’s for Vista (or that might end up on Vista, which means pretty much any MSI, I’m guessing).

One in particular hit me just a few days ago. Neeru indicates you need to set the ALLUSERS property to 1. He emphatically states you need to SET IT (not just leave it blank or not there at all). I’ve found that you definitely need to set it, but you should set it to 2, or you may end up getting UAC and “You don’t have proper permissions” messages, even though you’ve created the install to specifically NOT require admin privileges. Originally, I had ALLUSERS set to 1 and was getting a “requires admin privs” message even though my installation shouldn’t have required administrative privileges.

Another nugget:

  • Custom Actions
    1. Custom Actions in the UI Sequence will run with standard user privileges
    2. For Custom actions requiring admin rights, mark custom action as Deferred – No Impersonate

Anyway, he’s got a few other articles there, too, which make for some good reading.

MSI and Mapped Drives Part II

6
Filed under Installations, Troubleshooting

In my post here, I discussed a problem I’d run up against having to do with performing an ADMIN installation to a specific drive letter or network path, then unmapping that drive letter and remapping it to some other letter.

If you then attempt a client install, you’ll get either at 1327 error (for mapped drives) or a 1606 error (if you used network UNC paths).

After further testing, it appears that the problem comes from assigning the TARGETDIR property to the AdminProperties property.

Some background:

The AdminProperties property is a “;” delimited list of property names that should be preserved when performing an admin install. The MSI engine stores those property values as they are at the time of the administrative install into the created Client Installation MSI (the MSI file that ends up in the admin install folder). Here’s an example:

MSIRemoveTARGETDIR

and a little closer in…

MSIRemoveTARGETDIR

(Interesting bit of trivia: I have no idea how the MSI engine actually stores these properties in the MSI file, because opening the MSI file with ORCA, I couldn’t find them anywhere. I’m guessing they’re not stored as a normal table entry).

Normally, any properties you’d like to pass on to the client install (ie those collected via the User Interface during the Admin install), you would list as AdminProperties so the MSI engine will pass them on.

I had set the TARGETDIR property as an AdminProperty, because at one point, I believed it was necessary to preserve the path to the Admin installation, so the client installation could make use of it.

This turned out to be ill advised, however, because often, admin installations will be moved (for disk space reasons, reshuffling servers, etc), and preserving the TARGETDIR this way locked the Client install to always point back to the original administrative install. Instead, during a client install, I simply obtain the value of the current location of the MSI file (which, by necessity is the current location of the administrative install) and use it where needed.

At any rate, none of this should have mattered, because the documentation clearly states that the COSTFINALIZE MSI event checks the directory table for valid drive letters, not the Properties table.

However, directories stored in properties listed in the AdminProperties list are appearently special cases, and their validity is checked.

Moral of the story? Use InnoSetup<g>

But, if ya gotta use InstallShield, make sure you do not:

  1. Store the Admin Installation folder or any folder that might end up getting remapped or disconnected, into a property during the Admin install.
  2. List that property in the AdminProperties property.

This goes for the TARGETDIR property (a common one), but also any other properties you might create.

MSI and Mapped Drives

2
Filed under Installations, Troubleshooting

Don’t you just love strolling along merrily on a friday afternoon, thinking “My, the weekend is right around the corner, I believe I shall sup on crumpets and tea”, when you step right through a soft spot on the ground in fall into a viper pit?

Ever seen this error before:

(The blackout is to protect the innocent <g>)

It’s an MSI 1327 Error Invalid Drive, indicating (surprise) that a specific drive is invalid.

Basically, I got it while testing the install of an application I’m working on.

Many Google searches and a call to MacroVision later, and I still didn’t have much of an idea what was going on.

The drive letter in question WAS valid at the time I did the original administrative installation, but was no longer valid when I performed the client installation from the admin install.

To sum up:

  1. Map a folder to DRIVE X
  2. Perform an Administrative Install of your app to Drive X
  3. Unmap Drive X and remap the same folder to Drive Y
  4. Perform a client install from the administrative install that is now on Drive Y
  5. BOOM goes the dynamite

Even more interesting, I tried the same installation steps, but didn’t use a mapped drive. Instead, I used a UNC network path name, and then forced that network share to become invalid. I got a 1606 “Could not access Network location” message. Different error, but the same problem.

I turned on verbose logging for MSI and it recorded that the error occurred during the CostFinalize event. That event validates all folder entries stored in the Directory table in the MSI, but a quick perusal of that table revealed no references to the (now invalid) drive letter.

Macrovision support suggested trying the client install on another machine, which I did and got the exact same error.

Then, on a whim, I simply mapped a folder to that drive letter (the one in the message). Any folder, some share out on the network, didn’t matter what.

Viola! She workee!

Long story short, apparently MSI takes a snapshot of the drive (mapped or UNC) when you perform an administrative install. Then, when you attempt a client install from that admin install, if the drive that was in place at the time of the admin install doesn’t exist, you get the 1327 error (or if you used a UNC path, an error 1606). From what I can tell, though, it doesn’t actually use that drive for anything.

If you used a mapped drive, just creating a mapped drive with the same letter is enough to make MSI happy and continue with the client install.

If you used a UNC path, things aren’t so rosy. In fact, I haven’t found a recovery for this situation yet, though I suspect one is hiding under an MSI boulder somewhere…..waiting……

InstallShield Upgrade Joyosity

7
Filed under Installations, Software Architecture

I’ve been hunting down an issue with an InstallShield Installation for almost a week now.

Very strange. I have a new installation that is a BASIC MSI install (meaning it contains no funky InstallScript at all, and is this fully MSI compliant).

It is intended to upgrade several previous installations, one of which is also a BASIC MSI, but the others are all InstallScript MSIs.

When I first started testing the upgrade process, I did the install of the old version, followed by an install of the new version. When I went to ADD REMOVE PROGRAMS, the new was there, but the old version was as well. The upgrade didn’t work.

Grrr.

So I start digging. Eventually, I determined that the old version was actually being uninstalled (I paused the install midstream and sure enough, all the old files are one point are completely removed). However, for some reason, the entry in the Add Remove Programs list was not being removed.

More digging.

So I reset my test, installed the old version and at Macrovision’s request, I searched the reg and found a key here:

[HKEY_LOCAL_MACHINE\SOFTWARE\Microsoft\Windows\CurrentVersion\Uninstall\{F1C8EEFE-8019-44AB-8AA9-D6F13E3BFAF0}]

that contained all the info about the old installation.

There’s a value called NOREMOVE set to 1. Hmm, that sounds suspicious. So I set it to 0 and install my new version.

No joy, the old version is still listed in ARP. However, when I went back to the registry to check that key, it was gone! What the hell!? Ok, the entry in ARP must be coming from somewhere else. A few reg searches later turned up this key:

[HKEY_LOCAL_MACHINE\SOFTWARE\Microsoft\Windows\CurrentVersion\Uninstall\InstallShield_{F1C8EEFE-8019-44AB-8AA9-D6F13E3BFAF0}]

Notice that the GUID there is the same as the other GUID, but this one has “InstallShield_” at the front of the key name.

Delete THAT key, and suddenly, the ARP entry is completely gone.

It would appear that upgrading an InstallScript based install with a BASIC MSI install unintentionally leaves behind a key that it shouldn’t. Some searching the KBs with more specific keywords turned up exactly that.

An InstallScript based install created two entries in the Uninstall registry key, but one is ‘hidden’ from the ARP list view.

A Basic MSI install only creates one key. And if you upgrade an InstallScript based installation with a Basic MSI installation, that second key (the visible one) won’t get removed properly.

You have to add an entry to the RemoveRegistry table in the MSI file and connect it to a component that will be installed by your new installation.

Didn’t table-driven programming constructs die back in ’91 with Magic. No, wait. Ack, they’re still alive?!

Well, tried it then and hated it, still hate it today. To each his own.

InstallShield, Product Codes, Package Codes, and Upgrade Codes, Oh my!

77
Filed under Installations

So you’ve created an upgrade item with InstallShield (mine is 11.5), you’ve set everything up right as far as you can tell, and when you run in to upgrade a previous version, the installer pops up the “Modify/Repair/Uninstall” screen of the old version

Aha! You say. Forgot to change the Package code. So a GUID Generate and rebuild later, you try again and this time get this:

Another version of this product is already installed. Installation of this version cannot continue.

You got the Package Code different, Upgrade and Product Code the same in the two versions, and you’ve got a Major Upgrade item setup and configured to recognize the proper Old version number range.

What’s up?

Come to find out, the IS help is a little confused on this topic. When you create a MAJOR UPGRADE to your installation (which, if my experience is any indication, almost EVERY upgrade is a major upgrade), you need to change both the Product Code and the Package Code! But here’s the trick, the Upgrade Code stays the same.

Why? Because appearently, a Major Upgrade is considered an entirely new Product, even though it’s not, because you intend it to upgrade older versions of the product.

But MSI doesn’t use the Product Code for that, it uses the Upgrade Code for that purpose.

So, basic rule is:

When you create a new Version of your app’s installation with InstallShield (or any MSI based Installer, I suspect), be sure to:

  1. Make sure you have an Upgrade Item setup to recognize the proper version range
  2. Make sure you generate a NEW PACKAGE CODE guid
  3. Make sure you generate a NEW PRODUCT CODE guid
  4. Make sure you DO NOT modify the UPGRADE CODE guid (basically, you almost never modify the Upgrade Code guid)
  5. Kneel before the holy altar and make an offering to the MSI gods.

Here’s a handy table from a Macrovision support site article that also might help. Basically, it illustrates when a particular code needs to be changed (the X’s), based on what kind of upgrade the new version of your install is.

Update Type Package Code Product Version Product Code Upgrade Code
Minor Upgrade without Patching X
Minor Upgrade with Patch X X
Major Upgrade X X X

You know, I whipped out an install in InnoSetup in, like, 5 minutes. And it’s free.

McAfee and Word Automation

8
Filed under Installations, Office

Had an issue today where some automation code (basically VB that instantiates Word, Excel, or PowerPoint objects), started failing inexplicably.

The only thing the user could think of is that he’d just installed the lastest McAfee AntiVirus.

So, I tried a little test, opened Excel, opened the VB editor in it, then entered:

Sub Main
   Dim X as object
   Set x = CreateObject("Word.Application")
End sub

And that failed too!

After a few googles, I came up with this.

Appearently, McAfee includes a feature called HAWK (Hostle Activity Watch Kernel), that monitors things like CreateObject.

And the fun part is that even if you disable McAfee, HAWK still runs in the background. You have to turn it off seperately in the McAfee UI.

Yet another reason to use NOD32.