A long time ago, I built a MAME arcade machine. I call it the No18 Arqadium Engine. Head on over to http://forum.arcadecontrols.com to see it and a ton of other great arcade machine builds.
Over the years, it’s been extended, upgraded, and enhanced in a lot of different ways for a lot of different games.
Some time ago, I picked up a couple of these soft foam Psyclone Essentials Dance Pad controllers:

I couldn’t find the company anymore, so I doubt they’re still in business, but I did find a number of single and dual mat offering on on http://ebay.com so if you’re inclined, I’d head that way.
In my case, my intent was always to build my own actual pads and just use the controller boards from the Psyclone mats for the electrical bits.
Years go by
Well, one thing led to another, and we played the soft mats quite a bit but I never got the time to build up the hardcore Dance Dance Revolution arcade-style pads I’d intended on.
And then the dance game craze kind of faded, and my daughter moved off to college, etc, etc.
CraigsList strikes
And then one day recently, I stumbled upon a great deal on a Cobalt Flux dance pad on my local CraigsList.
It included a controller, and… drumroll… it worked flawlessly when I connected it up to the Arqadium!
Upgraded the copy of StepMania I had installed and pullled some newer tracks from the interwebs, and we were hooked again on DDR style gaming!
No Competition
But after all that, I was still missing the DDR style-competition side-by-side danceoffs on dual dance mats.
So I hit CraigsList again and within a few weeks turned up a DDRGame pad complete with a handlebar and PS2/USB controller hardware. Perfect!

No so fast
Got it home, hooked it up and… Nothing. The Select and Start buttons on the actual controller box worked, but nothing on the pad. However, the LEDs did light up when I stepped on an arrow, so I knew it was at least connected and getting power.
I played with it off and on for a few weeks. Connected to other computers, Tried other PS2 to USB adapters plus the one that came with the DDRGame unit but I couldn’t get anything to properly send the mat presses.
Deep Dive
At this point, I wasn’t sure whether the mat itself or the controller board was the issue.
The mat itself connects to the controller using a standard high density 15 pin DSUB connector (the old style VGA connector).
So, a couple safety pins and a Digital multimeter later, and I’d verified that all the buttons on the mat did, in fact, work. At least, when pressed, they completed a circuit from ground (the outer shell of the DSUB connector) to a pin.
Perfect. Standard basic buttons. Nothing fancy in the pad itself.
At this point, it’s time to start cracking heads.
First up, the DDRGame controller board

The RED pins are the arrows and X and O buttons on the mat itself. These markings on the controller board lined up with what I’d determined experimentally using the multimeter, so I knew I was on the right track.
The YELLOW squares highlight the SELECT and START buttons, which are actually on the controller box itself.
This lead to a pinout of the 15 pin DSUB as follows.
| Pin 1 | |
| Pin 2 | X or Up Left |
| Pin 3 | |
| Pin 4 | O or Up Right |
| Pin 5 | Ground |
| Pin 6 | |
| Pin 7 | |
| Pin 8 | |
| Pin 9 | |
| Pin 10 | |
| Pin 11 | Right |
| Pin 12 | Left |
| Pin 13 | Down |
| Pin 14 | Up |
| Pin 15 | Ground |
Keep in mind that 15 pin High density DSUBs are numbered in 3 rows starting with one, as shown here:
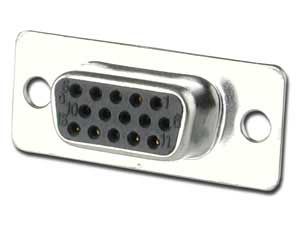
Notice that Pin 1 is at Top Right. Pin 6 is right below it and Pin 11 is Bottom Right.
Next up, opening the Psyclone controller.

I didn’t grab a photo of this board within it’s own housing. Here. it’s pictured already installed in the DDRGame controller housing.
Note the START and SELECT buttons (YELLOW), and the contact pads for the various buttons (labeled J1-J9 in RED) plus a large center pad (GROUND) and one peculiar pad, 4th from the right (LIGHT BLUE) that should be J7, but instead isn’t numbered at all.
After some experimenting, I was able to get the pin out here as:
| J1 | J2 | J3 | J4 | J5 | J6 | unlabeled | J7 | J8 | J9 |
| START button 10 | UpRight button 2 | Right | DownRight button 4 | Up | Down | DownLeft button B1 | Left | UpLeft button B3 | SELECT button B9 |
At this point, it was just a matter a digging up a 16pin male DSUB connector, and soldering wires from the DSUB to the contact pads on the controller.
Snags
So two minor things came up in the process.
First, I discovered that whatever the contact pads were coated with, solder did not stick to it. No amount of flux, resin etc worked, so I ended up gently scraping the pads down to the bare copper foil and then soldering.
Second, after I’d gotten it all soldered and together I plugged it in to try and nothing worked, at least the arrows didn’t.
Turns out, the mat itself uses the DSUB shell as a ground. I suspected as much and using a quick alligator jumper wire between the shell and a ground pin confirmed it.
So, another quick solder of a jumper wire between the shell and one of the ground pins, and presto! We were in business!
Now we have side by side metal dance pads and lots of DDR competition!


